In this blog, we will explain the process of creating a data transfer object(DTO), Converter and populator, facade. We will show you the process of calling facade from the controller class and defining spring bean and its properties. We will create one model attribute and populate it. We will modify the UI by making a change in the tag file.
We take one example and this example explains how to show cart subtotal without taxes. Remember that there are many other ways by which we can show cart subtotal without taxes but we took the following approach to explain the above points.
Show cart subtotal without taxes/How to show cart subtotal without taxes?
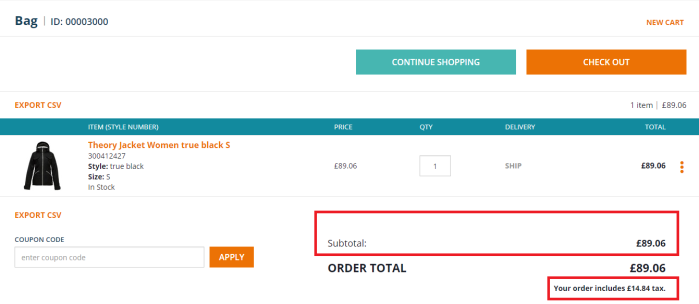
Currently in SAP Hybris Commerce Accelerator when we add products to the cart then it shows cart subtotal with taxes. You can observe this in below image where we added one product to the cart in the apparel storefront that shows cart subtotal with taxes.
Now here our goal is to show cart subtotal without including taxes. To achieve this goal we do not make any changes in OOB(out of the box) files but we use them from our created custom files to achieve this goal. We need to follow the following steps to achieve this goal.
- Create data transfer object(DTO)
- Create converter and populator
- Create facade and populate the data
- Call the facade from CartPageController/ Modify CartPageController
- Modify the cartTotal.tag file
1. Create data transfer object(DTO)
Now we will create one DTO(data transfer object) class named as SubTotalWithOutTax and it contains one property called as a sub of PriceData type. This sub property will hold the value of order subtotal without taxes.
Steps to create SubTotalWithOutTax DTO class
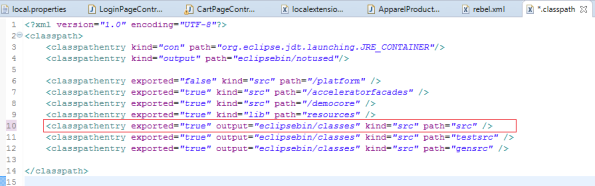
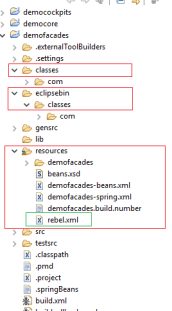
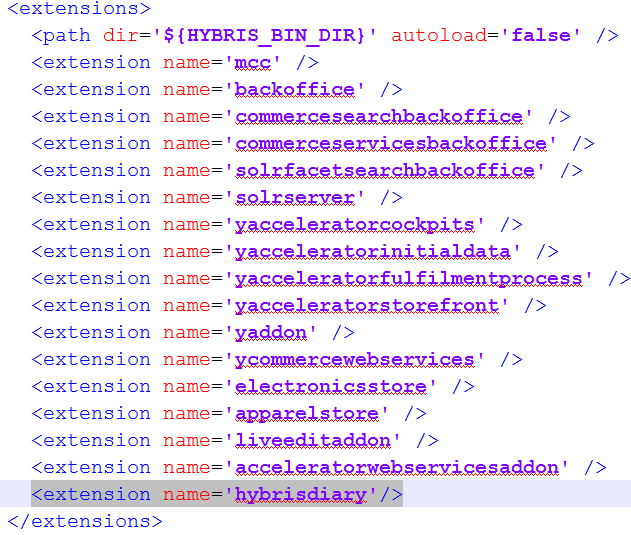
- Navigate to yacceleratorfacades->resources and open yacceleratorfacades-beans.xml.
- Add the following lines of code to yacceleratorfacades-beans.xml file.

Note: This entry must be between <beans> </beans> tag. - Build the hybris system by running ant clean all.
After successful build we can check our SubTotalWithOutTax DTO(data transfer object) class at the specified package and the file will look like this.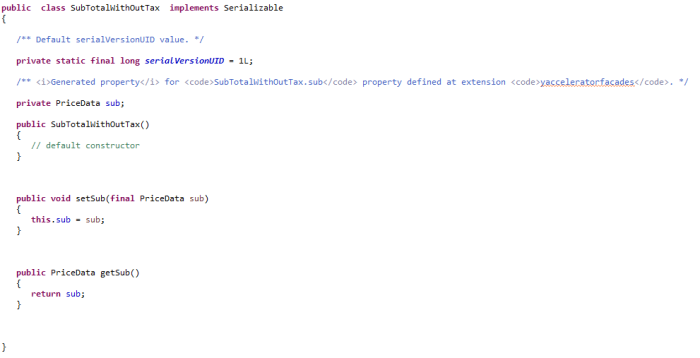
SubTotalWithOutTax.java
2. Create converter and populator
Before learning how to create converter and populator we need to know why we need converters and populators?
Now we will create a converter and populator for our SubTotalWithOutTax DTO(data transfer object) class. We need to follow the following steps to create a converter and populator.
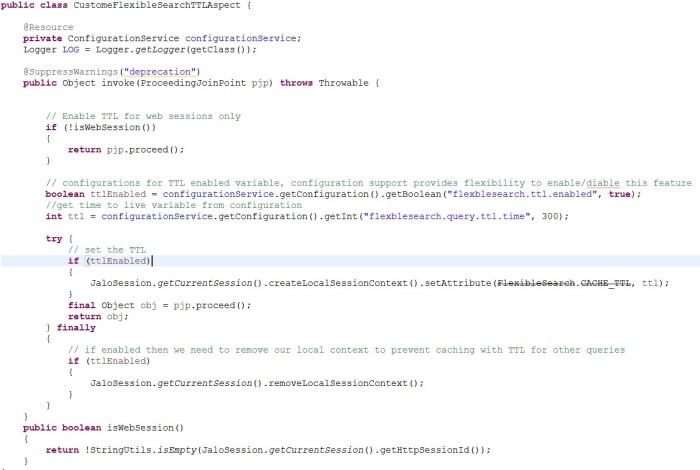
- Now we create SubTotalWithOutTaxPopulator to fill the data in SubTotalWithOutTax DTO(data transfer object) class as you can see in the below image. SubTotalWithOutTaxPopulator implements the Populator interface.
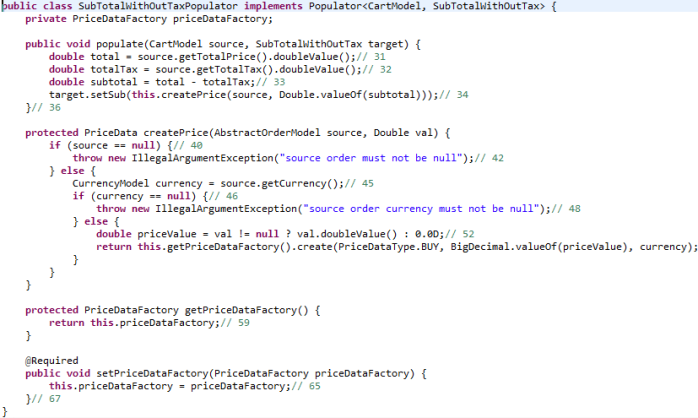
SubTotalWithOutTaxPopulator.java - Navigate to yacceleratorfacades->resources and open yacceleratorfacades-spring.xml. Now we define a spring bean for the new SubTotalWithOutTaxPopulator and SubTotalWithOutTaxConverter as shown in below image.
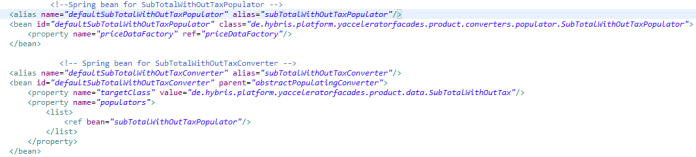
yacceleratorfacades-spring.xml - Build the hybris system by running ant clean all.
3. Create facade and populate the data
Generally, facade classes are created to call the services and to fill the data in DTO(data transfer object) class using converters and populators.
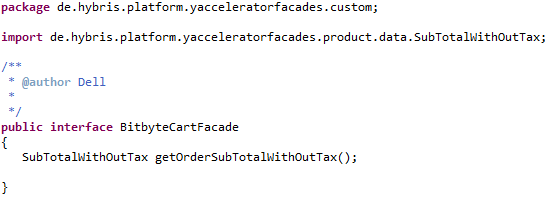
In our case, we create one DefaultBitbyteCartFacade class that implements BitbyteCartFacade interface. Through this class, we make a call to CartService and populate the data in SubTotalWithOutTax DTO class using converter and populator.
We need to follow the following steps to create BitbyteCartFacade
- Navigate to yacceleratorfacades->src and create an interface named as BitbyteCartFacade. as you can see in the below image
BitbyteCartFacade.java - Now we provide the implementation for the BibyteCartFacade interface in DefaultBitbyteCartFacade class.
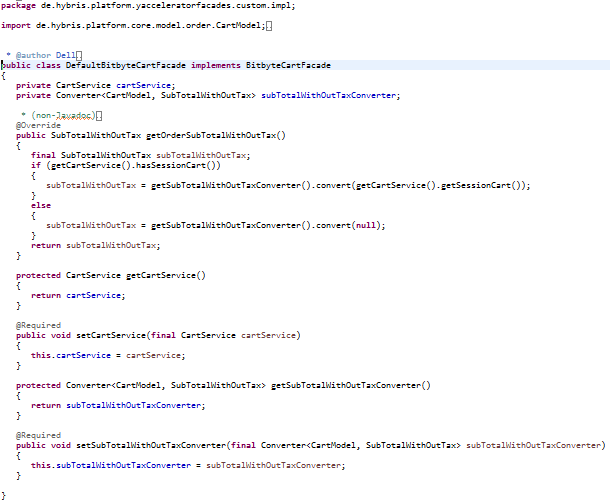
DefaultBitbyteCartFacade.java - Navigate to yacceleratorfacades/resources and open yacceleratorfacades-spring.xml. Now we define a spring bean for the new DefaultBitbyteCartFacade as shown in below image.

yacceleratorfacades-spring.xml - Build the hybris system by running ant clean all.
4. Call the facade from CartPageController/Modify CartPageController
CartPageController is permitted to use annotation-based declaration so we inject BitbyteCartFacade as shown below in CartPageController.

Now add following lines of code inside prepareDataForPage method

Build the hybris system by running ant clean all.
5. Modify the cartTotal.tag file
Navigate to yacceleratorstorefront->web->webroot->WEB-INF->tags->cart and open cartTotal.tag file.
Replace the following lines of code with line number 14 and 15 to this file as shown in the image.

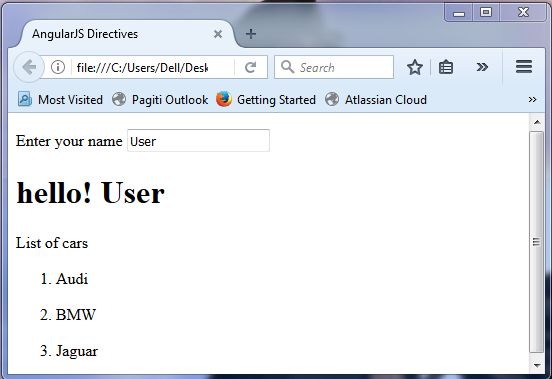
After saving this file, refresh apparel storefront and you can clearly observe that subtotal of the cart does not include taxes.
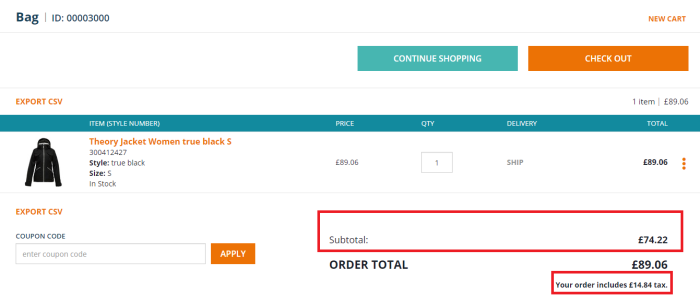


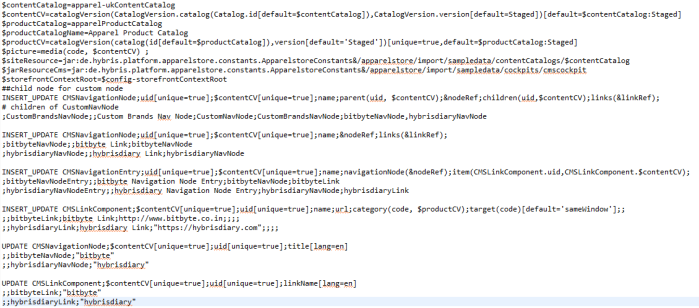

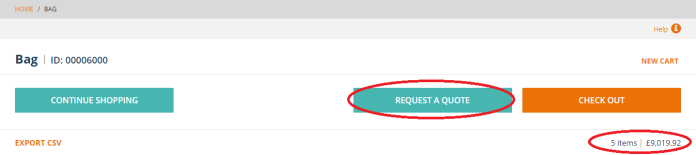
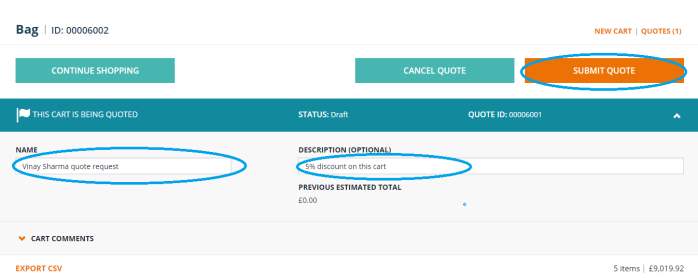
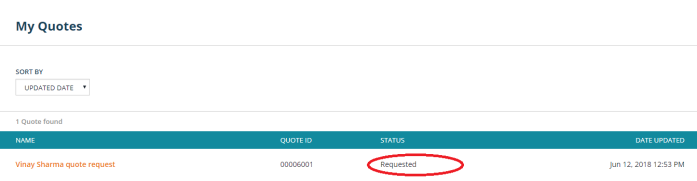
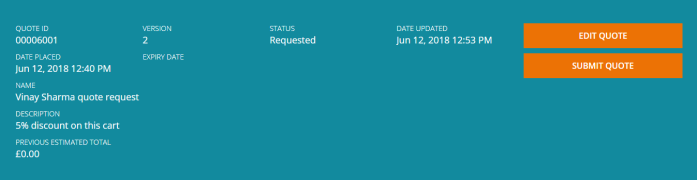
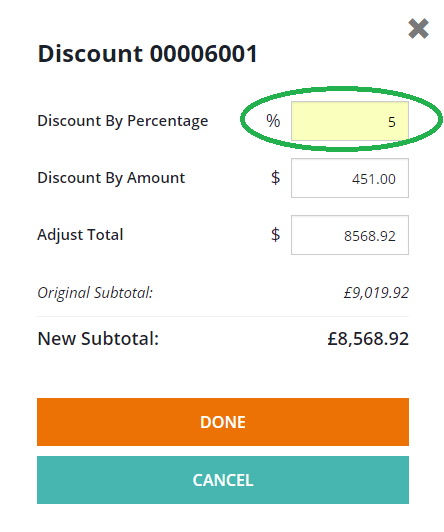
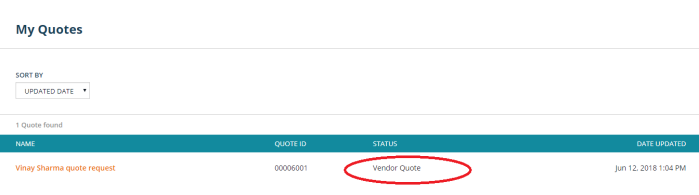
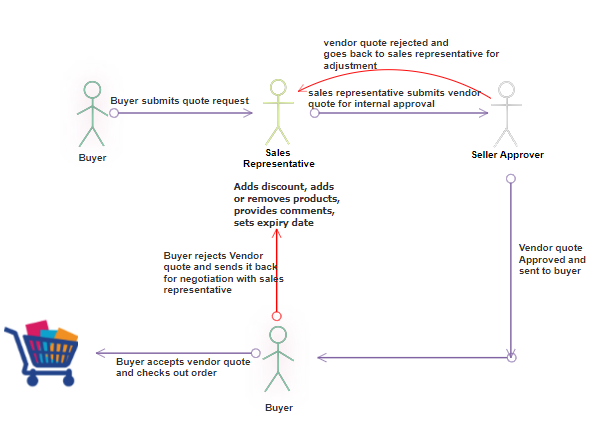 Diagram:- The quote process when a buyer initiates a quote
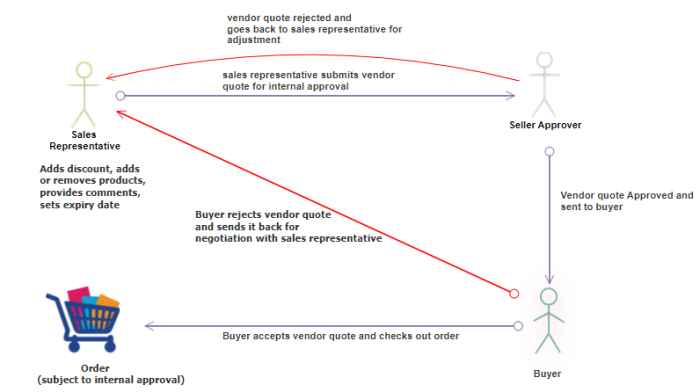


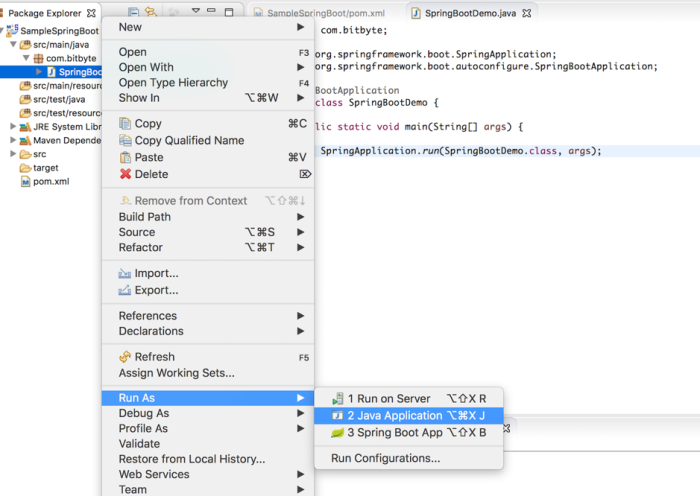
 We are creating SpringBootDemo application this is the starting point for our application and @SpringBootApplication tells spring this is spring boot application and create servlet container and deploy in a container.
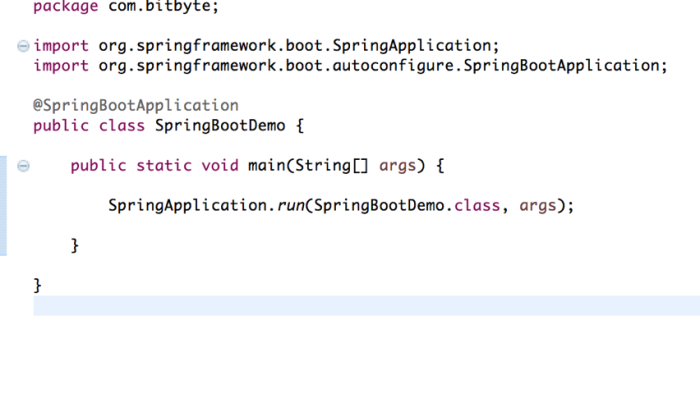
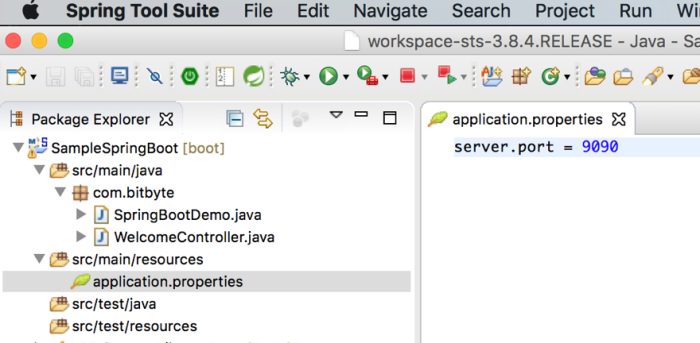
 Overriding Tomcat port number in “application. properties” file, if the Tomcat default port (8080) is listening to some other process.